Setting up the first Rust project
1. Prerequisites
On Windows: Install Visual Studio Community
- download from: link
- open installer
- make sure to select Desktop development with C++
On Unixes: Make sure to have a version of gcc or clang installed
- Ubuntu: sudo apt install build-essential
- Mac: brew install llvm (probably)
- BSD: pkg install lang/gcc
2. Download rustup
This is a tool that makes it easy to install the different components of the rust compiler
- on Windows, download the executable and run it
- on other OSes, run the command that begins with curl in a terminal
- type 1 to begin the install
3. Install Visual Studio Code (VSCode)
Go to the extensions page in the menu (a square made from 4 other squares, usually the last button) and install the following extensions
- rust-analyzer (id: rust-lang.rust-analyzer)
- C/C++ (id: ms-vscode.cpptools)
- Even Better TOML (id: tamasfe.even-better-toml)
- CodeLLDB (id: vadimcn.vscode-lldb)
Other optional extensions:
- Error lens (id: usernamehw.errorlens)

4. Create a new project
Cargo is a tool that helps building and packaging Rust applications. The usual workflow is:
- open a terminal
- cargo new hello_world => creates a new project with the name hello_world. This will also create a git repository for the project.
- cd hello_world => changes the directory in the newly created folder
- cargo build => builds the project
- cargo check => prints errors without actually building the application. Is used because it's faster than the build command.
- cargo run => builds and runs the project
- cargo fmt => formats the source code in the community approved code style
Right now, you should see Hello, world! on the terminal.
5. Listen to this at least four times
😃
6. Observe the files created by cargo
- Cargo.toml specifies meta information for our project like the name, the version, and the libraries that it uses
- .gitignore is a file that git checks in order to ignore files that are not needed to be committed.
- src/ is the folder that contains all the source files
- src/main.rs is the file that usually contains the main function ran at the start of the program
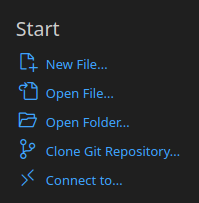
7. Open the project in VSCode
Type code . in the terminal
Or open a VSCode instance, go to File/Start=>Open folder=>navigate to the folder that contains Cargo.toml => OK
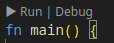
8. Run the program
Either by pressing the Run near the main, after the initial loading finishes.
Or:
- Go to menu and click the button with a triangle and a bug
- Click
create a launch.json file
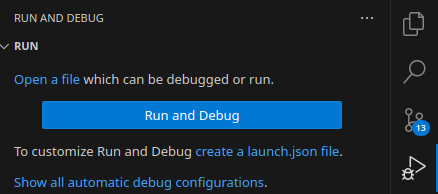
- Select LLDB
- Press Yes
Now you can use F5/Ctrl+F5 and the other commands to run and debug the application.
9. Debug shortcuts
| Key | Description |
|---|---|
| F5 | debug the program/continue execution |
| Shift-F5 | stop execution |
| F9 | insert/delete breakpoint |
| F10 | next line |
| F11 | go into the function if there's any |
| Shift+F11 | run to the end of the function |
| F12 | go to the definition of the symbol |
| Alt+LeftArrow | go back |
| Alt+RightArrow | go forward |
| Ctrl+S | save file; this will usually trigger the error checking |
Print example
#![allow(unused)]
fn main() {
let rabbits = 5;
println!("Hello world! I have {} rabbits.", rabbits);
}
Problems
At the end, upload all the problems below to a GitHub repository under a folder named lab01.
Make sure to format (cargo fmt) your code before uploading.
-
Make a function that calculates if a number is prime, and call it with every number from 0 to 100, printing the primes.
-
Make a function that calculates if two numbers are coprime, and call it with pairs of every number between 0 and 100.
-
"Sing" the 99 bottles of beer problem.
Use the debugger after this: put a breakpoint on the first line of main, and run it line by line. Try to get familiar with the shortcuts. Observe the variables in the panel as they change.